Home / Guides / Binance sign-up and invite code
Binance Sign-up and Invite Code: From Account to KYC Approval
The most important line first: the invite code can only be entered during sign-up. Once the account exists, there is nowhere to add it. This walks through the real order — check the region, enter the code, do identity verification, then finish the security settings.
If you have already finished signing up and are now digging through the settings for somewhere to enter an invite code, you won't find it, and not because you are looking in the wrong place. That field only ever appears once, during sign-up.
What follows is the sign-up flow in the order Binance's public sign-up page and help centre present it, with the screenshots dated to when they were taken. What you see will differ by region and by when you look. Anywhere a specific fee, cap or review time comes up, we give the date we checked it. When you're actually doing it, go by what the page shows you at the time.
What's in here
- Three things to check before you start
- Where exactly the invite code goes
- Step by step: web and mobile
- Identity verification and why it gets rejected
- Three security settings to add immediately
- Test the new account with a small amount
- How fees are charged, and where the discount comes from
- Sign-up failures at a glance
- Common questions
Three things to check before you start
Signing up isn't hard. What's hard is hitting a restriction and not knowing which one you hit. Two minutes on the three things below will save you most of the rework later.
One: whether your region can use the global site
Binance offers different products in different countries, some through a locally regulated entity, and in some places it will send you to a different site entirely. What decides this is mainly where your connection comes from and which country issued your ID document. When those two disagree, the document wins, because identity verification is looking at the document.
Here's what the Binance sign-up page looks like when it opens normally. If your region isn't served by the global site, you'll get a regional notice first, pointing you to the locally regulated site. If you see that, work out which site you're supposed to be on before you start filling anything in.
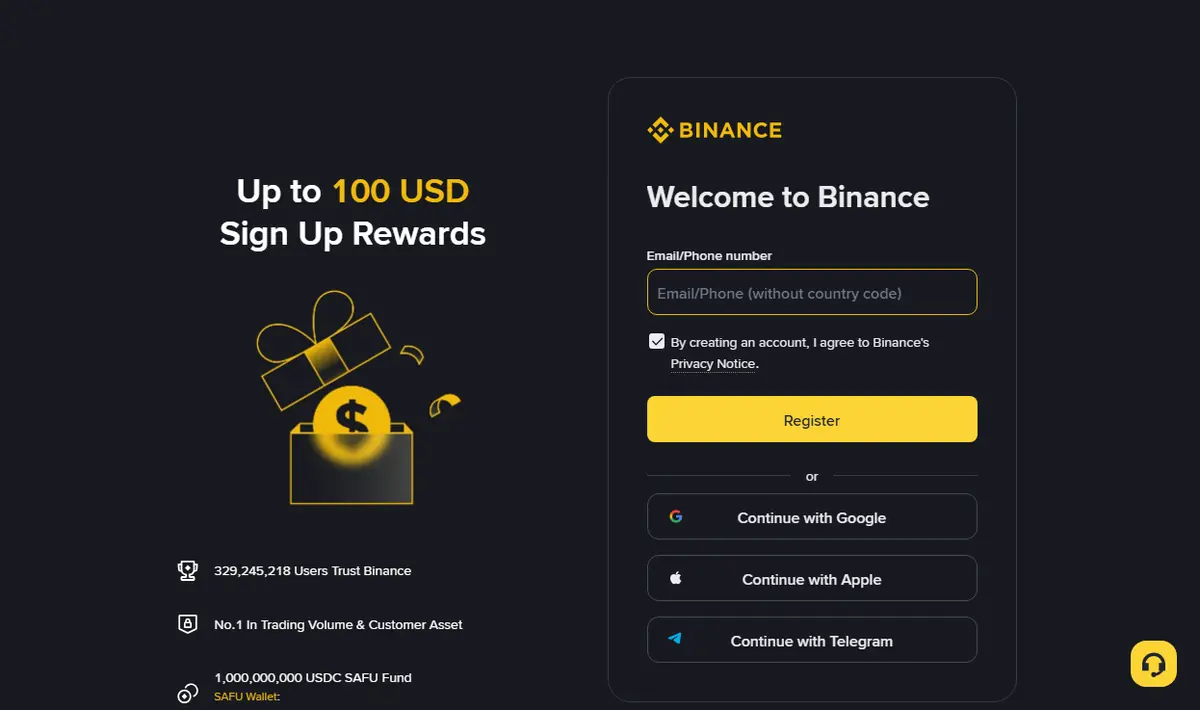
If you do get a regional notice, don't try to route around it. Routing around it only pushes the problem to identity verification, where a mismatched issuing country stops you anyway, and switching networks back and forth is a good way to trip risk controls. The thing to actually do is work out which site you belong on.
Two: email or phone number
Either works, and you can link the other afterwards. Our suggestion is to lead with email: an email address survives changing phones, carriers and countries, whereas a dead phone number makes account recovery a lot harder. And use an address you've had for a long time and that itself has two-factor protection — far safer than spinning up a fresh mailbox. The floor on your account security is usually the security of whatever inbox receives the codes.
Don't use a work address, and don't use a shared team mailbox. You lose access to those the day you leave.
Three: have your ID ready
Verification needs photographs of the original document. Before you start, check it's in date, that all four corners are intact, and that the lamination isn't scuffed. If your passport page is catching the light, move the lamp. Take the document out of any plastic holder before you photograph it; a sleeve adds reflections over exactly the details the check needs to read.
In one line: confirm your region, prepare an email address you'll keep for years, and photograph a clean document clearly. Do those three and the rest rarely jams.
Where exactly the invite code goes
Straight answer: inside the sign-up flow there is an optional field, collapsed by default, usually labelled "Referral ID (Optional)" or "Invite code". Expand it, type the code in, and only then finish the sign-up.
It is collapsed by default.
That makes it easy to miss: the form looks complete, the button is lit, and pressing it is the natural thing to do. Open the field before you press anything.
Three ways people get it wrong
- Finishing sign-up and then looking for it. It isn't there. The referral relationship is fixed at the moment the account is created; there is no setting afterwards that changes it.
- Typing it into the wrong box. The invite-code field and the verification-code field sit close together, and a code typed into the wrong one will keep failing. Read the label before you type.
- Using a referral link, then switching browser or device. The code in the link only travels with the browser you opened it in, so switching browser or device part-way can lose it. The reliable approach: whether or not you used a link, type the code into the field yourself and confirm you can see it sitting in the box before you continue.
How to confirm it attached
Nothing pops up to say "linked", which is why people are left unsure. The way to check is to log in and look at the referral or rebate page inside your account: if it attached, your referrer information or the corresponding rebate relationship shows up there. If there's nothing at all, the field was almost certainly empty at the time.
Two caveats. The location and name of that page shifts between versions and isn't identical on web and in the app. If you can't find it, search "referral" in the help centre. And whether the relationship attached is a separate question from whether you've traded: a brand-new account that has generated no fees will of course show zero rebate, but the relationship itself should already be there. Don't read "rebate is 0" as "it didn't attach".
If you confirm it genuinely didn't attach, there's honestly no fix. The pragmatic way to think about it: this relationship buys you a small discount on fees, not something you must have. Closing the account and starting over, or opening a second account on a relative's ID, carries far more risk than the discount is worth. Getting your account security and your own habits right matters much more than saving that slice of fees.
Goes in the "Referral ID (Optional)" field during sign-up. Up to 20% off trading fees; the actual rate is whatever Binance shows at the time.
This is a referral link: if you register through it with invite code BN6971, Binance may pay KVYTO a referral fee. It does not cost you more, going by what Binance shows at the time. KVYTO is not the official Binance website.
Step by step: web and mobile
The fields are identical either way. The only difference is that mobile collapses things harder, so the optional item is easier to scroll straight past. For a first account we'd suggest the desktop web: bigger screen, easier to read, and simpler to get document photos across from a camera.
-
Open the sign-up page and choose email or phone
There's normally a toggle at the top. Pick one and enter it; for a phone number, get the country code right.
-
Set a password
Usually at least eight characters with an uppercase letter and a number. Don't reuse a password from another site — an exchange password should be a string you have never used anywhere else.
-
Expand the collapsed optional field and enter the invite code
This is the field from the section above. While it's collapsed it may be nothing more than a line of small print, and the input box only appears once you open it, so skipping past it means signing up without the code. Before you continue, look back at the box and check the code is complete and hasn't picked up a stray space from the clipboard. One more thing: if you refresh the page at this step, open the field and check the code again before you continue.
-
Accept the terms and submit
The terms and privacy checkbox has to be ticked; often it's already ticked for you. If it tells you your region isn't supported at this point, go back to the first thing in the previous section.
-
Enter the verification code
An emailed code may land in spam. Codes expire; if yours does, just send another. You don't have to redo the whole form.
-
Account created — now stop for a moment
You can log in now, but you're two steps away from actually being able to use it: identity verification and security settings. Don't rush to deposit. Keep going.
Identity verification and why it gets rejected
Identity verification is what people mean by KYC.
Until it's done, fiat deposits, P2P and withdrawal limits are all restricted; the account is essentially look-but-don't-touch. So it's best to push straight through it after signing up.
What to have ready
- The original document: national ID, passport or driving licence, with the accepted types depending on your country or region;
- A device with a camera: the face check almost always has to be done live;
- Somewhere evenly lit: an overhead light leaves glare on the document, and daylight near a window usually works best.
The usual reasons it gets rejected
All of these are technical problems. Fix and resubmit; one rejection doesn't count against later attempts.
| What you see | Usually because | What to change |
|---|---|---|
| Photo judged blurry | Camera shake, or focus locked onto the table | Lay the document flat, move in close then back off slightly, wait for focus to lock on the document before you shoot |
| Corners cut off | Shot too close, corners out of frame | Get all four edges in the frame with a little margin around them |
| Glare hiding key information | Overhead light or flash | Flash off, move to side lighting, take the document out of its sleeve |
| Face check fails | Backlighting, glare off glasses, forehead covered | Face the light, take off hats and sunglasses, turn your head slowly as prompted |
| Details don't match the document | Misspelt name, wrong date of birth, or nationality that doesn't match the issuing country | Compare character by character with the document, including middle names and hyphens |
| Document expired | It has genuinely expired | Use one that's in date, or renew it first |
Review time depends on when you submit and how long the queue is; sometimes it's quick, at peak times it can take a while. Our suggestion: submit once and go do something else. There is no need to log in and out repeatedly, and don't submit several times in a row; wait for the result of the first submission. Which documents are accepted where, and how review times are counted, is in the Binance help centre, where the guidance tracks local rules.
Use your own document, only. An account opened on a relative's or friend's ID isn't yours, and neither are the assets in it when something goes wrong; in most places it's also a breach of the rules. Borrowing a document to save trouble can cost you the entire account and everything in it.
Three security settings to add immediately
Don't skip this section. Crypto transfers can't be reversed. Once someone else controls your account and the coins are gone, they're gone; no support desk can claw them back. All three together take under ten minutes.
Two-factor authentication
Use an authenticator app for the rotating codes first, and SMS only as a fallback: that's also the order CISA recommends for multi-factor authentication. SMS codes can be bypassed by SIM-swap attacks, which have happened in plenty of countries. Once it's set up, write the recovery key down on paper and store it — don't just screenshot it into your phone's photo library. When a phone is lost, the photo library and the authenticator usually go together.
Anti-phishing code
This is a string you choose yourself, and every genuine Binance email to you afterwards carries it. An email from "Binance" without that string can be treated as phishing on sight. It costs almost nothing to set and it filters out a whole category of phishing email.
Withdrawal address whitelist
The third one is the most fiddly and the most worthwhile.
With it on, coins can only be withdrawn to addresses you added in advance. Even if the account really is compromised, the attacker can't send coins straight to their own address. The cost is a wait when you add a new address yourself, a very good trade.
There's a sequencing point worth thinking about early: a newly added address normally sits through a cooling-off period before it can be used, so don't leave adding it until the day you actually need to transfer. If you already know which wallet address you use and which platform you withdraw to, add them all in one go right after you enable the whitelist, and no future withdrawal has to wait.
One small thing more: as you add each address, give it a label you'll understand later: "my cold wallet", "deposit at exchange X". An address is a long string, and picking the wrong one by glancing at the first and last few characters is easy. The loss from choosing the wrong address is not reversible.
While we're on devices and sign-in
With those three done, the foundation is in place. The other half is habit: if a device you don't recognise shows up in the login history, kick it out and change the password; don't log in on a public computer or someone else's phone; only install the app from an official app store or the official site. The top search result isn't always the real one.
One thing to plan for: when you change phones, the keys inside your authenticator app don't automatically come with you. Before you switch, make sure you have the recovery key, or move two-factor to the new device while the old phone still works.
Don't leave that step until after the old phone has been factory-reset.
Three lines to remember: there is no situation in which anyone officially "verifies" your seed phrase or private key; whoever asks is a scammer; support does not phone you out of the blue; and no official channel will ever tell you to move your assets to a "safe address". Those three sentences block most of the impersonation playbook.
Test the new account with a small amount
Once verification passes, the account is open but untested. Before real money goes in, send one small amount through it. The full route for that (deposit, buy, move into Earn, redeem, withdraw) is laid out in how to get USDT; this section only covers what that first run tells you about the account you just set up.
Three account-level questions get answered on the way: whether the two-factor check you switched on in the security step actually appears when you withdraw; whether a withdrawal hold shows up because you changed security settings recently (if it does, the page says how long it lasts); and whether your verification level covers the deposit route you plan to use.
Write down what each step asked you for. If something blocks you, it is much easier to sort out on an amount you don't mind waiting on.
Don't count the sign-up bonus as a return
The sign-up page and the app home often carry a new-user rewards entry, and the headline figure doesn't look small. These campaigns are real, but read the terms with three things in mind: whether the reward is cash, a voucher or trial funds; whether you have to complete a deposit or trading task before you can claim it; and whether it expires and is forfeited automatically. Miss any of those and you get the gap between "I thought I had it" and "I don't".
Trial funds are especially easy to misread; they can usually only be used to generate a return, with the principal taken back at the end, so what you actually keep is the return alone. That isn't a trap; it's written plainly in the terms. The problem is that they are easy to skip.
More importantly, don't let that copy drive your decisions. The bonus is one-off; the fees and product rules stay with you. If you make trades you didn't want to make just to hit a task threshold, the extra fees and the volatility you take on can easily exceed the bonus. We don't restate any campaign amounts here: these change faster than anything else on the site, and a figure written today can be wrong tomorrow. Read whichever version of the terms is on the page when you claim.
How fees are charged, and where the discount comes from
Keep two things apart. Your fee rate is set by your tier and whether you pay fees in BNB. The referral discount comes from the referral relationship formed at sign-up. They don't affect each other. So entering a code never makes you pay more and never raises your base rate.
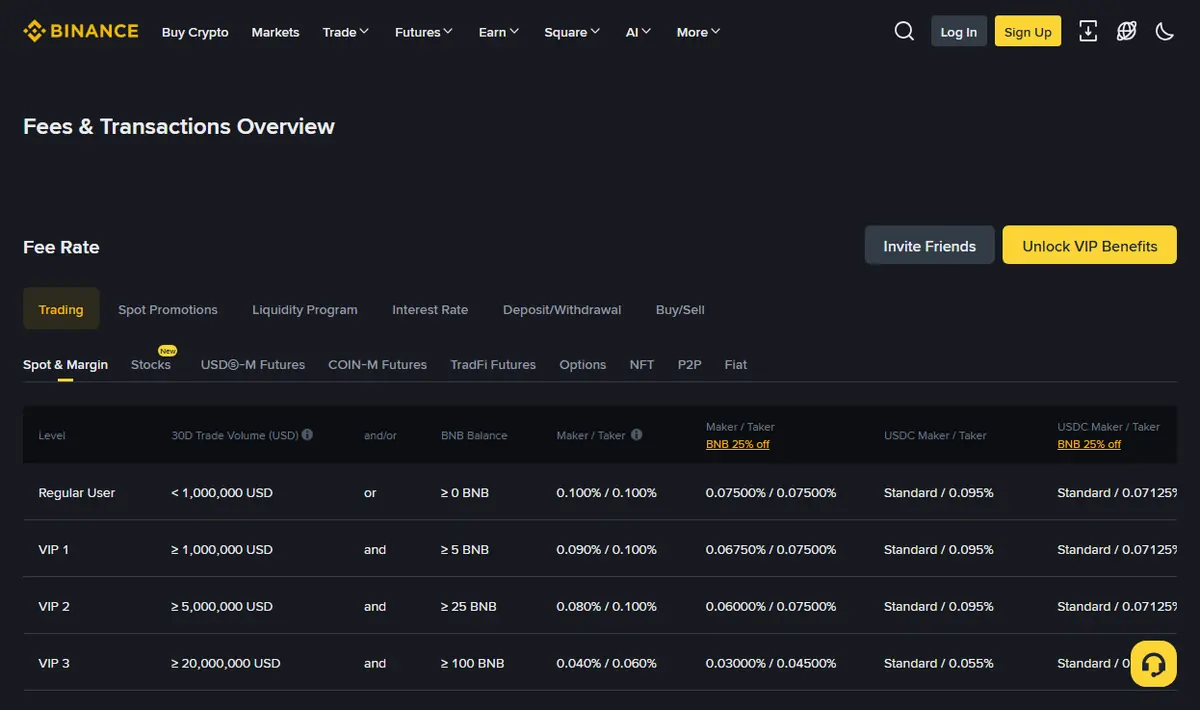
Here's what Binance's public fee page looks like, with the regular user's spot maker and taker rates and the BNB-discounted versions in the same table:
Should you turn on the BNB discount
That discounted column comes from the "pay fees with BNB" option. With it on, each fee is charged at the discounted rate but taken out of your BNB balance. It isn't free money: you have to hold BNB first, and BNB's own price moves.
Put another way, you save a certain small amount of fees and take on an uncertain amount of price exposure. For people who trade often and whose fee spend is visible, the maths usually works. For someone who places a handful of orders a year, buying BNB to sit there for the discount means the price swings can easily swamp the fees saved. The toggle can be turned off at any time. Just work out which of those two you are first.
And don't assume the two discounts simply stack. The referral discount and the BNB discount are separate mechanisms; which applies first and what each is calculated on is spelled out in a dedicated section of the fee page. Read that section rather than working it out yourself.
On the size of the discount: the page says "up to". What actually lands on your account depends on the current campaign and which referral relationship you came through. So treat anyone quoting you a fixed, guaranteed figure with suspicion, including us. What this site says is: register with invite code BN6971 for up to 20% off trading fees, with the actual rate being whatever Binance shows at the time, subject to change with their policy.
Sign-up failures at a glance
The traps scattered above, collected in one place so you can check against them.
| What happened | Most likely cause | What to do |
|---|---|---|
| Page says your region isn't supported | Your connection's location or your document's issuing country is out of scope | Work out which site you belong on; don't try to route around it |
| Verification code never arrives | It went to spam, or the carrier blocked an international SMS | Check spam first; if SMS won't arrive, switch to email |
| "This email is already registered" | You registered before and forgot | Use password recovery, don't open a second account |
| Invite code entered but didn't take | Wrong field, or the page was refreshed after typing it | It only takes effect during sign-up; it can't be added later |
| Verification stuck "under review" | Queue, or repeated submissions pushed you to the back | Wait it out; don't resubmit repeatedly |
| Verification rejected again and again | Photo quality, or details entered wrongly | Work down the rejection table above |
| Account restricted by risk controls | Switching network or device frequently in a short window | Stay in one environment and contact official support as prompted |
Common questions
- Can I add the invite code after signing up?
- Once the account exists, that field doesn't appear again. Binance binds the referral relationship at the moment the account is created, and there's no setting afterwards where you can add it. The only way to have that relationship is to open a new account on a different email or phone number, and repeatedly opening accounts as the same person carries its own risk. We wouldn't open a second account for this.
- If I enter an invite code, do I pay higher fees?
- No. Your fee rate is calculated from your VIP tier and whether you pay fees in BNB, and has nothing to do with whether you entered a code at sign-up. What the code does is put you into a referral relationship carrying a fee discount; the relationship on this site is worth up to 20%, and what lands on your account depends on the current campaign.
- Is identity verification mandatory? Can I use the account without it?
- Barely. Without verification, fiat deposits, P2P trading and withdrawal limits are all restricted and many functions simply aren't available. Rather than signing up and leaving it, get verification done in one go, so you aren't stuck half-way when you actually need the account.
- If verification gets rejected, does that hurt future attempts?
- The common rejection reasons are technical — blurry photo, cropped corners, glare over the document number, a selfie that doesn't match the document photo. Fix and resubmit; it normally has no bearing on later attempts. What's genuinely awkward is a problem with the documents themselves, like an expired ID or a nationality that doesn't match the issuing country. Sort the document out first.
- What should I do first after signing up?
- Set up two-factor authentication, an anti-phishing code and the withdrawal address whitelist before you think about depositing. Together they take under ten minutes, and they guard against account takeover and phishing, two ways of losing money that are very hard to reverse.
That collapsed “Referral ID (optional)” row on the sign-up form takes this string. There is no way to add it afterwards — it is the one step in this whole guide you cannot go back and fix.
Once the account is open, verified and secured, the next question is usually "so where do I put this USDT". The rules differ more than you'd expect between tiers. Use the interest estimator to put a number on it before deciding whether to commit, and for how long.
KVYTO is not the official Binance website and does not speak for Binance; this site contains Binance referral links. Crypto asset prices are highly volatile, Earn products are not principal-protected, and you can lose your entire principal.